Heirloom Tomatoes & Wristband

*These heirloom tomatoes were made using the directions from Martha Stewart's tutorial on sewing "homegrown" tomatoes.

My directions are a shortened version of what I found on the site above.

Materials
-cotton fabric for tomato body
-thread
-cotton batting
-fabric glue
-felt for tomato top

1. Cut a circle out of your fabric. Mine were about 7 inches in diameter.


2. With fabric wrong side up, sew a running stitch around the perimeter of the circle (having a knot at the end). Pull the string to gather the fabric.


3. Stuff with cotton batting (good for pincushion use). Stitch opening closed with left over thread after stuffed. Tie off thread on top.


4. Cut out tomato topping (template from the site above here), glue down the top onto tomato to cover stitched closing. Take remaining thread (with a knot), starting from the tomato top, in center, thread the needle down through the tomato, out the bottom and back up. Repeat a few times. *Pull thread tight during this step* Tie off on top of the tomato. Running thread through the core (and keeping tight) should give the tomato a flattened heirloom look.

This is what it could look like on the bottom of the tomato after the core threading.


Finished heirloom tomatoes


How to make one into a pincushion wrist band:
extra supplies:

-slap bracelet (I searched every where and found one at Walgreens, not even a plain one)
-rubber glove
-cotton fabric to cover bracelet (mine is green)

1. Measure and cut out a 2 3/4" x 9 1/2" fabric piece for your bracelet. Make sure it fits (fold in half to size. It should have some extra space on all sides for seam allowance).

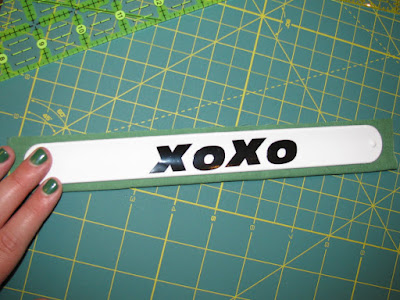


2. Once right sides are face to face, and fabric is folded in half, sew a 1/4" seam allowance down one long edge and the bottom short end (leaving one short end open).


3. Cut fabric edging close to seam.


4. Fold right side out.


5. Slide slap bracelet into cover.


6. Sew last side together and cut close to seam when finished.


Finished with bracelet cover!

To attach a tomato to bracelet:

*For this bracelet I made the running stitch farther apart from each other to allow for more batting. I stuffed it fuller and didn't flatten into an heirloom shape as much, allowing more space and room for the length of the needles.*


1. After threading down through the core of the tomato, thread through the top fabric of the bracelet and back up the tomato (may need to use a glove to grasp the needle to pull out if you stuffed it really full). I marked the center of mine so I would know where to thread. Don't pull thread tight until the very end!!


2. Thread back down through the tomato and the top of the bracelet fabric in an X formation, remembering to keep the thread loose.


3. Once you are finished threading through the tomato and the fabric of the bracelet (and your needle and thread are pulled out the top of the tomato), pull the thread tight. Tie off thread and done!

Finished pincushion bracelet!


17 more pincushion wristband how-to's

Some favorite DIY Projects

*Tutorials are on pic links*

1. Vintage bow tie (super easy)


2. Homegrown Tomato Pincushions

from marthastewart.com
(pictures from my heirloom tomatoes as well as how I turn one into a pincushion wristband)


3. No slip book mark


4. Oversized Owl Bag


5. Cinched bag


6. Summer dress


7. Anthro Orimono Pillow

iPod Cozy Case

A How-To for a pretty easy case for your iPod (or iPhone) that is cozy ! (fits an iPod touch)


Materials

-fat quarter of your choice of fabric, exterior material (for my two cases i chose 100% cotton and sweat shirt material)


-fat quarter of fleece of your choice, inside material (if fabric is already fuzzy on one side, skip getting the fleece material, the fabrics will rub wrong and create problems with lining this up neatly)

- 1/2" elastic, ~10 inches (optional)


How-To:

1.
Cut both fabrics to be 4.5" x 12"


2. Pin fabrics to each other, face to face.

3. On the ends (short sides), sew a 1/4" seam allowance (it doesn't sounds right, but trust me!)

4. Turn fabric right side out, and press. Make sure those seamed sides are pressed good to make a nice edge!

5. Fold in half, so that the short sides that were seamed, are meeting. Pin in place.

6. If you are adding the optional elastic to help hold the case around your hand or to help keep the iPod in (although it will stay in without it), then add the elastic this step. Have fabrics right sides out. Pin the elastic to the fabric (the sides that will be the EXTERIOR of your case. This will mean that when you sew the sides with the wrong sides out, the elastic will be nestled in between your two fabrics inside). Right side of fabric still out, pin elastic about 1.5" from the side to make sure it's not sewn into the side seam. You could also pin it in the middle if you'd like.

7. Drape elastic up and over the top (the edge where the iPod will fit it) and pin elastic in place on the opposite side, making sure elastic reaches from bottom to bottom of each side. 10" should be ok, but best to measure! You don't need to leave a lot of elastic over the top edge. When finished pinning it could be pulling on your fabric a bit, no biggy.


(elastic pinned to both front and back. back view)


8. Turn fabric fleece side out (careful if you have elastic pinned)! Sew 3 edges with a 3/4" seam allowance, keeping top part open for the iPod to slide in.

9. Cut off edges as close to seams as you can get.

10. Fold right side out, done!

*The camo cozy case was the one made with sweat shirt fabric. It doesn't have the fleece lining inside since the fabrics rubbed wrong. To make the top seam, I sewed a 1/2" seam allowance. That's why it looks shorter on top. The elastic fits snug, but doesn't pull.


*To make these cases, I took directions from a few websites and meshed them together. They were both made differently.

Shana's iPhone covers (great photos!)

Julie Ree's iPod cozy (has elastic info.)

Log Cabin Block

The Log Cabin is a really fun block to make. It seems complicated because there are a lot of pieces and measuring going on, but it is quite simple after all your pieces are cut.
**Makes 8 total blocks**

CUTTING/MEASUREMENTS: (see all sample squares and logs in picture below)

#1: cut a 1 1/2" x 22" strip of center square color (mine is red, a medium dark, for the hearth or fire. you can also have yellow as your center square for a candle, black for death). Cut 8- 1 1/2" center squares from this giving you 8 little red squares after.

#2: cut a 1 1/2" x 22" strip of another dark color. The same as the center square, cut 8- 1 1/2" squares. You will have a second set of 8 small squares.

#3: cut a 1 1/2" x 22" strip of a medium dark color (mine green). Cut 8- 2 1/2" logs from this.

#4: cut a 1 1/2" x 22" strip of a medium light color (mine yellow). Cut 8- 2 1/2" logs from this.

#5: cut a 1 1/2" x 22" strip of another medium light color (mine light blue). Cut 8- 3 1/2" logs from this.

#6: cut a 1 1/2" x 22" strip of a dark color (mine dark blue). Cut 8- 3 1/2" logs from this.

#7: cut a 1 1/2" x 22" strip of another dark color (mine dark flower pattern). Cut 8- 4 1/2" logs from this.

#8: cut a 1 1/2" x 22" strip of a light color (mine light flower pattern). Cut 8- 4 1/2" logs from this.

#9: cut a 1 1/2" x 22" strip of another light color (mine light seed pattern). Cut 8- 5 1/2" logs from this.

#10: cut a 1 1/2" x 22" strip of another medium dark color (mine green again). Cut 8- 5 1/2" logs from this.

#11: cut a 1 1/2" x 22" strip of another dark color (mine dark blue again). Cut 8- 6 1/2" logs from this.

*I reused a few of my fabrics, so some of the "logs" are the same fabrics choices.


(cut up squares and logs, ready to go)


HOW-TO:

*You will be sewing squares and logs together, always rotating counter-clockwise to add on next log. (see pic below)

*When in doubt, see picture, and make sure to set up a block with pieces in correct placement and order before sewn together to remind you of which log pieces should go where and which order to sew in.


*You can also number each piece (for your first block) with a sticky note to remember which piece is which and in which order. Once you have a sewn block, this should suffice for a good model, no sticky notes needed.

*I will also be referring to certain pieces by their #'s so there is less confusion. Each cutting step was labeled with a #. These #'s go with each piece. (example step 1, was #1 one piece. So red square is #1, dark flower pattern square #2. See picture below).


1.
Sew #1 piece (center red square) to #2 (dark flower pattern piece). Always place face to face, and (always) sew 1/4" seam. Red piece stays on left! Press. (see pic above)

2. Sew #3 to #1 and #2, underneath. Press. (see pic above)

3. Sew on #4 to side of #3 and #1. Press. (see pic above)

4. Continue the pattern around, pressing after each seam. (see pic above)


(finished block, on it's side)

Variation 9-Patch Block

* I used the same fabric choices as the 9-Patch block.


**Makes 2 total blocks**


Strip sets of each:
Light color- cut one 1 1/2" x 22" strip (small! they are those little patches!)
Dark color- cut one 1 1/2" x 22" strip


-Sew L&D strips together.
-Cut sewn strip into 16- 1 1/2" segments.
-Arrange segments into 8- 2 1/2" squares (outer corners with small squares, see picture below, on right).
-Cut 8- 2 1/2" squares from your Light color and one 2 1/2" square from your dark color (see picture below, on right, large light squares).


-Arrange rows:
Top row: small 4 patch square, large light color square, small 4 patch square.
Middle row: large light square, large dark square, large light square
Bottom row: small 4 patch square, large light color square, small 4 patch square.

-Sew row by row like the 9-Patch block.


TIPS
*Top and bottom row differ by the way the small dark squares lead into the middle.
*Make sure the seams butt up so that the seams line up for a nice meeting of corners. I found this block a little more difficult since I like my corners to always meet up perfectly. Didn't always happen!


(9-Patch block, Variation 9-Patch block)


9-Patch Block

**Makes 5 total blocks**

Strip set A

Light color- cut 2- 2 1/2" x 22" strips

Dark color- cut 4- 2 1/2" x 22" strips

*Sew a strip set of Dark-Light-Dark (using the same face to face set up from the rail fence)

*Press seams towards dark fabric.

*Once strip set it sewn, cut strip into 10- 2 1/2" segments.

Strip set B

Light color- cut 2- 2 1/2" x 22" strips

Dark color- cut 1- 2 1/2" x 22" strip

*Sew a strip set of Light-Dark-Light

*Press

*Once strip set it sewn, cut strip into 5- 2 1/2" segments.


-Arrange segments into the 9-patch block pattern. (see picture below, on left).
-Sew rows together. (Top row to middle row, bottom row to middle row. All face to face). Press.


TIPS

-Make sure to line up seams before stitching! If they aren't lining up, make sure segment row seams are going in opposite directions. This way the seams can butt up against each other allowing the corners to meet nicely.


(9-Patch block, Variation 9-Patch block)

Rail Fence Block

This block is the easiest and a good block to start with.
**Makes 9 total blocks**


1. First cut 2 1/2" x 22" strips from three coordinating colors. In my picture below, I chose a dark, a medium and a medium light.

2. After strips are made, take dark strip and medium strip and line them up face to face. Sew 1/4" seam (always). Steam seam towards the dark fabric. Open up so faces are out. Add the medium light strip to the medium strip (strip in the middle), face to face. Sew seam and press. Cut now sewn strips, into 3- 6 1/2 inch squares (shown below).

*Don't forget to cut off the edging aka the salvage to start.
*Make sure you have a straight edge on one side (the side you cut the strips from). You can make this by lining up the fabric against a line on your cutting mat and cutting a straight edge.

*Straight edge should also be used to line up material at (0,1) on your mat to cut strips.

Fabrics and Tools

Fabrics

My first Quilting 101 class session covered the tools and fabrics needed to make a sampler quilt (a quilt constructed of a collection of different patterned blocks).

I was limited to the fabric selection that was available in the shop where my classes were held. I could have gone else where to purchase fabrics, but I had never picked any out before for a quilt, so I decided to get the help and purchase at the store. They specialize in vintage 19th century reproduction fabrics, so that is what my sampler quilt fabrics are comprised of.

I picked out 8 different colors: (L to R)

-2 darks
= 1/2 yard (one dark can be the focus fabric, aka the outer border of a quilt. This will need an extra yard of fabric equaling 1 1/2 yd. for focus fabric and only 1/2 yard for other dark option.)
-2 mediums= 1/2 yard
-2 medium lights= 1/2 yard
-2 lights
= 1/2 yard

-inner border= 1/4 yard (for a finished 1 in. border)
-binding= 3/8 yard
-backing= 1 1/4 yard

*They are all complimentary colors of my focus fabric (far left fabric).
*Measurements are for a small-ish sampler quilt (I will put up measurements after quilt is made).


Tools

-working sewing machine

-1/4" quilting presser foot (optional if you have a marked 1/4" line on your machine)

-100% cotton thread

-18 x 24 cutting mat (I have an Olfa mat)

-6 x 24 ruler (I have this one), and a 6 x 12 ruler (I have this one)
*These can also be found at a Jo-Ann Fabrics, Michael's etc.

-45 mm blade rotary cutter (like this one)

-sewing pins

-sharp scissors

-sharp seam ripper

Starting Out

I am the person who has always wanted to sew amazing things. I had a very simple sewing kit when I was younger that allowed me to hand stitch felt stuffed animals. Over the years I have gotten to be a little bit more adventurous in the sense that I started sewing seams and then graduated to completing a dog pillow (a really easy pillow where all the sides are sewn, it's stuffed, and then the gap is sewn shut). Nothing complicated. I didn't even worry if I was sewing straight seams.

Since getting older I feel that I should now be at the point where I am able to sew and create things. I had the very large and challenging ambition of learning how to quilt after I found many free patterns online of Harry Potter quilting blocks (I am a huge HP fan! I also just saw that this site is now starting a new Lord of the Rings project as well, which is the other amazing fantastical series that I'm gaga for. This is where I found my Harry Potter inspiration for a quilt).

Since I plan to have children some time in the future, I really wanted to be able to make them a quilt, and I wanted to start with a Harry Potter quilt. I couldn't just jump right into it without knowing what I'm doing or the basics, so I finally looked for an affordable class in my area. It didn't take long until I ran into a local shop that offered a Quilting 101 class that taught quilting basics such as how to choose fabrics, the proper tools etc. Sign me up! and I did. It was the perfect time too with summer just starting since I teach for a living.

The rest of this blog will be about my sewing adventures! This will include my progress through the Quilting 101 class (including my sampler quilt that will be completed at the end of the 6 week session quilting class), as well as other projects that I bravely attempt.

Sewwww, on with the sewing!